
April 21, 2007
Style vs Substance
Style vs Substance Revisited
Posted by: RocketJones at
08:02 PM under Presentation
| Comments (2)
| Add Comment
Post contains 66 words, total size 1 kb.
Approximately one in twelve people may not be able to use your web site properly due to some form of color blindness. At best, your site won't look to a color blind person as you designed it, at worst, this could mean that text is unreadable, navigation unusable and elements are invisible.
This site can give you ideas and links on how to account for colorblind visitors.
Posted by: RocketJones at
07:49 PM under Presentation
| Comments (1)
| Add Comment
Post contains 71 words, total size 1 kb.
A great place for inspiration is the CSS Zen Garden website. There are literally hundreds of sample pages to look through, and the amazing thing is that each site uses the same content file! The only difference between them is the CSS, which shows you just how incredibly versatile and powerful it is.
To change the look of your web pages, you'll need to modify the CSS that controls your site. First, we'll copy the default into your own folder, make a backup copy (always a wise thing to do) and then set up your site to use the new CSS file.
1. Create your own CSS Folder. On the editing menu sidebar, click on the the Folders link and you'll see a list of all the folders that exist for your site (such as Images and Files). Down at the bottom of the list is a button marked New. Click that.
On the next screen, there are a few text boxes to fill out. For Type, enter "Directory". Name and Path are both "CSS". Scroll down to where you see Index Template and Page Template and enter "list.file" and "edit.file" respectively (note that those words are separated by a period). At the bottom, click the Save button.
2. Copy the default CSS. On the editing sidebar, click on the New File link. The folder needs to be "CSS" and in the path box type in "http://mee.nu/css/mee.nu.css" (without the quotes). Then click the Upload button.
Now, if you click on the Folders link in the sidebar, you'll see your CSS folder that you created in step 1. Click on the "css" in the path column and you'll see a file in that folder named "mee.nu.css". That's your copy of the default. We'll leave that alone and make any changes to a copy of that.
Click on the file name and you'll see a "File Info" screen. On the File Operations box, select "Copy" and in the File text box next to it, give it the new file name, such as "my-site-name.css". The important part is the .css extension, don't forget that part. Click the Go button and you'll see that you've made a copy of the default template. This copy is the CSS file that you'll be toying with.
Any changes you make won't be seen unless we do one more thing, which is point your website towards the new CSS file.
3. Use the new CSS file. Click on the Templates link on the editing sidebar, and then click on the Header template. You'll see the Header template (ta-daaaahhhh!).
About six lines down you'll see this line:
<link rel="stylesheet" href="/css/mee.css" type="text/css" />
The bit in red is the part where you want to put in "my-blog-name.mee.nu/css/my-blog-name.css" (this time you want the quote in there). Obviously, you'll put your real site name there instead of the italicized my-blog-name.
4. Tinkering. The easiest way to fiddle with your CSS (if you've never done it before) is to save a copy of it to your PC and use a text editor such as Wordpad to make changes. Then upload the modified file to your site and overlay it on the old version (that's why we made a backup copy of the original). Look around inside the CSS and you'll see where various bits and pieces are described, and where you can change settings to get different colors. A nice color chart can be found here at Mandarin Designs, which is a great resource for HTML and CSS ideas and examples.
Bonus! Color Theory: From the color chart, you can see that colors are described by six characters, each ranging from zero to 'F' (it's hexidecimal). The first two characters control the amount of red, the middle two green, and the last two blue (ever hear of "RGB"?), so that combinations make up the gazillions of colors available. Straight white is "FFFFFF" and straight black is "000000".
Posted by: RocketJones at
05:59 PM under Presentation
| Comments (3)
| Add Comment
Post contains 729 words, total size 5 kb.
April 20, 2007
Minx makes it simple to add this nifty little feature. Every time someone visits your webpage or hits the refresh button, a different quote will be displayed.
Here's how to do it:
1. Create a "quote" file. I used notepad, but anything that will save a text (.txt) file will do. Put whatever you want in there, for example...
When the animals rise up in revolt, dogs and cats have special plans for Mr. Bob Barker.
I am not a crook. -- Richard Nixon
Nice doggie. -- George of the Jungle
The key here is that each quote is ended with a Return (or Enter, depending on your keyboard). Other than that, no blank lines between sentences, etc.
2. Create a new template. Let's call it Sayings. Click on the template link (under Manage, over on the editing sidebar), and at the bottom of that page click the "New" button.
Fill out the form.
Type: Data
Name: Sayings
Content: in this block just cut and paste your quotes from the text file you did in step 1.
Save.
3. Now go into your Sidebar template, pick out where you want your quotes to appear, and paste the following:
<h2>Uncommon Sense</h2>
[quote:random data.sayings]
<p>
Save and that's it! You can change the heading between the "h2" tags to say whatever you want, and Minx will do the rest.
I've done this example here on Quickstart, so you can see how it works. Psst, over there, on the sidebar.
Posted by: RocketJones at
04:48 PM under Content
| No Comments
| Add Comment
Post contains 248 words, total size 2 kb.
So you've come up with some categories to organize your writing, now lets do something with the idea.
In your sidebar template, paste the following snippet:
<h2>Categories</h2>
<ul>
[categories]
<li><a href="/[category.path]">[category.name]</a></li>
[/categories]
</ul>
Save the template, and then go check out your page. You should see a list on your sidebar showing each of your categories. Even better, you can click on the category names and all the posts under that category will be displayed. If you add categories in the future, they'll automatically be included too.
Posted by: RocketJones at
04:29 PM under Presentation
| No Comments
| Add Comment
Post contains 89 words, total size 1 kb.
April 16, 2007
One thing that many bloggers do to keep things organized is to give each of their posts a category. Suppose you're going to be posting once in a while about your favorite baseball team, the Toledo Mudhens. You've decided that it would be useful to have a category called "Mudhen Mania" so that folks can find all of your Toledo Mudhen posts in one easy click.
Here's how. Go into your editing menu, and on the sidebar under the Manage header, click on "Folders". Look at the list returned, and find the line labeled "Category", with name and path both being "Example".
Click on the word "Example" under the Name column and you'll see the folder template set up for the category Example. Take note of how things are filled out (scroll down too, or you'll miss the Index and Page template settings). Back out and then at the bottom of your list you'll see a button marked "New".
Click that, and you'll see a blank form to fill out. Type will be "Category", Name and Path will both be "Mudhen Mania", and the Link To will be "Category:Mudhen Mania (/Mudhen Mania)".
Scroll down and set your Index field to "Index.Entry" and the Page field to "Page.Entry" (note those periods between the words). Then scroll down some more until you see the button marked "Save". Click it and you're good to go.
Now, when you create a new post, in the pull-down Category list you can select "Mudhen Mania" and the post will be categorized that way.
Next time, we'll set up a list of all your Categories in the sidebar and show how to assign multiple categories to a single post.
FYI: the category of this post is Presentation. It's listed below next to the timestamp, and the category icon above (ABC123) will always appear next to posts in the Presentation category.
Posted by: RocketJones at
04:09 PM under Presentation
| Comments (10)
| Add Comment
Post contains 317 words, total size 2 kb.
There are as many reasons to keep a blog as there are people in the world. The best advice I can give is to keep posting and you will eventually find your voice.
Someone once divided the blogosphere1 into two groups; the linkers and the thinkers. Linkers post lots of links to other internet sites that they find interesting or amusing. Thinkers tend to produce more essay or analysis type posts on any given subject. It's a broad spectrum, and everyone falls into the range between the two extremes.
Here are some examples of various bloggers2 to give you an idea of various formats:
Besides her regular posts, Annika has "Poetry Wednesday", where she posts works by various poets. In a similar vein, Cindy has "Friday Feathers" which features her nature photography and a little bit about the birds in the pictures.
Politics of every flavor is a popular blogging topic. If you do much surfing through the blogs, you're bound to run into them.
"Slice of Life" blogging is my term for personal diarists like Bou who writes about her family, or Sarah who mixes personal stories of her life as a military wife with bits about her dog and her knitting hobby.
When more than one person contributes, it's called a group blog. The Llama Butchers is one such, with very eclectic content that includes history, current events, pop culture, twisted humor, and frequent griping about commuters in the DC Metro area.
And just because I can, I invite you to visit my site Rocket Jones. I post about hobby rocketry, cult cinema, recipes and pretty much the next shiny thing that catches my eye. I've been writing Rocket Jones for four years now (with occasional help from my youngest daughter Mookie), and have had over a half million visitors to the site.
Each of the links above feature a sidebar full of links to other sites, which have more links to other sites, and so on and so on. Explore a little. Humor, religion, family, cats, cooking, personal finance, whatever you can imagine, there is almost certainly someone out there writing about it. If they can, so can you.
The most important thing is to have fun. If you don't enjoy doing it, then why bother?
1 The "blogosphere" is the term coined to embrace the entirety of blogs. It's a clumsy term that many don't like, but everyone knows what it means when it's used.
2 Blogger: that's you. One who blogs.
Posted by: RocketJones at
10:20 AM under Tips
| Comments (3)
| Add Comment
Post contains 421 words, total size 3 kb.
April 15, 2007
Have you logged in already? If so, then from your site you'll see a little orange "edit" selection near the top in the menu bar. Or you've gotten to the main menu, which looks something like this:
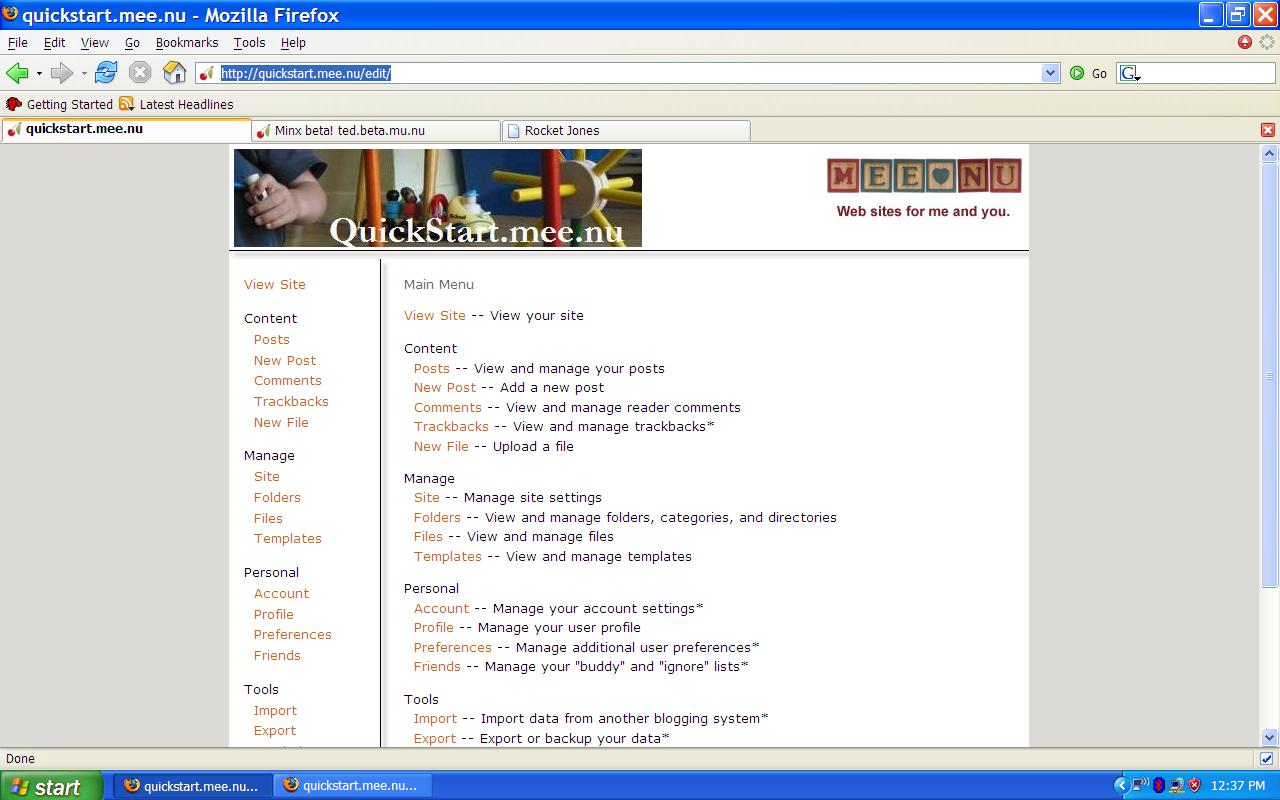
For now, I'll show you how to create and publish a simple text post.
Step one is to look on the right hand column and click on the link called "New Post". Sounds simple, eh? You will then be shown a screen that looks sort of like a word processor document, with a place where you can enter a title. Don't worry about Category just yet, and Status should equal "Publish" for now.
In the block labeled "Text" you have three rows of buttons to do all kinds of familiar formatting things to your words, and you can hover your mouse over them to see a little explanation box pop up.
So you type in whatever you want to say... what about that second block just below, titled "More"?
That's for an extended entry. Say, for example, that you have a wonderful essay to post, but it's thirty pages long. You might want to put the first few paragraphs on the main page, and the rest in the extended entry. On your site, a hyperlink called "more" will appear at the bottom of the post, and clicking that will open up the rest of the article so that people can read it. This is good because often people won't bother to scroll down forever to see if there's anything else new to read below the current post.
The rest of this post is in the extended entry. Click on the "more" to see it.
more...
Posted by: RocketJones at
04:39 PM under Content
| Comments (2)
| Add Comment
Post contains 454 words, total size 3 kb.
First, before you go register I'd suggest a little thought about what to name your site and how you want to be known around this little corner of the internet. For example, naming your site "I Love Bill.mee.nu" might seem perfect right now, but what happens if later you decide that Bill is a jerk and Oliver is the light of your life? That could become awkward. So take a moment and come up with something you can live with for the long term. Internet sites aren't as permanent as tattoos, but there are folks out there who've had an online presence for fifteen years and more.
Likewise with your user name. "BillsLittleShnookums" might be perfect, until you aren't, and then it's too late to change it.
You can choose to be anonymous. If your site is going to become the leading online authority about left-handed knitting needles, then you'll be fine, but perhaps you'd rather not put your real name out there in case those crochet fanatics get wind of your site and declare you an enemy of all things made of yarn. Some folks go completely anonymous with an obvious psuedonym like "Cynical Observer", others go with plausible sounding false names (my last name isn't really Jones). Some folks let it all hang out there and post under their real name. A little thought up front will make things go more smoothly in the long run.
All right... think, then go register. When you've done that, stop back by here, and I'll have more to help you along.
more...
Posted by: RocketJones at
01:55 PM under Tips
| Comments (3)
| Add Comment
Post contains 285 words, total size 2 kb.

36 queries taking 0.027 seconds, 72 records returned.
Powered by Minx 1.1.6c-pink.